Implementing AuthVOD

In this topic, you will learn how to create an AuthVOD monetization package.

Understanding AuthVOD

AuthVOD (AUTHenticated Video On Demand) is a monetization package where viewers must authenticate, that is enter a username and password, to the Brightcove Beacon app to watch videos included in the package. The videos may or may not show advertisements, depending on how you configure that package.

See the Understanding Monetization Options document for more information on AuthVOD, as well as all monetization packages you can use with Brightcove Beacon.

Configuring an AuthVOD package overview

Here are the high-level steps in configuring an AuthVOD package:

  1. In Brightcove Beacon, create an unpublished, cost free package.
  2. If ads are desired, supply an ad provider when creating the package.
  3. In Video Cloud Studio, add data to videos' custom fields to assign them to the AuthVOD package.
  4. In Brightcove Beacon, ingest the videos and clear the cache.

Creating a package in Brightcove Beacon

Here are the detailed steps to follow in Brightcove Beacon to create an AuthVOD package:

  1. Click the Commerce tab along the top of Brightcove Beacon.
    get to add new package button
  2. Select SVOD/AuthVOD Plans from the left navigation.
  3. Click the Add New Plan button.
  4. On the Package tab supply the internal name and be sure to leave the Status as Unpublished.
    package tab
  5. If you wish to use advertising, you can click the Yes radio button for Advertisement then choose an Ads Provider from the dropdown.
    package tab
  6. On the Textual Data tab enter the name visible to viewers, and a headline about the package.
  7. If desired, supply an image that will display with the package information.
  8. On the Streams tab, enter values for the maximum number of devices that can stream at the same time, and the maximum number of devices that can have an active connection.
  9. If you wish finer control of the package availability, click the Yes radio button for Advanced Streams?, then complete form with finer availability options.

Add videos to the package in Studio

To add content to the package, you need to use Video Cloud Studio to assign values to custom fields. The two custom fields that you must assign values to for an AuthVOD package are:

  • beacon.rights.<counter>.packageName
  • beacon.rights.<counter>.type

The steps below detail the process of assigning values to those custom fields.

For each video you wish to be in the package, complete the following steps:

  1. Log in to Video Cloud Studio.
  2. In the Media Module, click on the video name to view that video's properties.
  3. Click the CUSTOM FIELDS' Edit button.
  4. For the beacon.rights.<counter>.packageName, enter the name of your AuthVOD package created earlier.
  5. For the beacon.rights.<counter>.type, enter SVOD.

The following screenshot shows an example of actual values used in the custom fields. In this case, the counter is zero (highlighted in red) and the package name is AuthVOD Test (highlighted in yellow). Remember when implementing AuthVOD, the beacon.rights.<counter>.type is always set to SVOD.

custom field values

Ingest videos into Brightcove Beacon

Changes that are made to videos in Video Cloud Studio need to be ingested into Brightcove Beacon. This is done automatically every hour, but you can also ingest manually on demand. The broad steps will be detailed below.

  1. In Brightcove Beacon, in the top menu, click on the Tools (wrench icon) tab.
  2. From the left navigation, be sure the Ingestion option is selected (it is the default option).
  3. Click the Update Brightcove Videos button.
  4. Once the ingestion is finished, you can check to be sure your videos have been assigned to your AuthVOD package by first clicking in the top menu the Commerce tab.
  5. From the left navigation, be sure the Packages option is selected (it is the default option).
  6. Click the name of your AuthVOD package.
  7. Click on the Content tab to see the assets assigned to this AuthVOD package. An example of this tab is shown here:
    content
  8. To start cache clearing, in the top menu, click on the Tools (wrench icon) tab.
  9. From the left navigation, click the Cache option.
  10. Click the Cache Purge button.

Now, any viewers who are authenticated to the Brightcove Beacon app will have access to AuthVOD content. If a viewer tries to play a video while NOT authenticated, a message appears in the bottom-left of the video prompting them to sign in, as shown here:

sign in prompt

Unpublishing or deleting a package

If a package is no longer needed you have two options:

  • Unpublish: You can unpublish a package that will be needed again. For instance, you have a special package associated with a holiday that you will use year after year. This is a good use case for unpublish.
  • Delete: You can delete a package and it is not recoverable. For instance, you have an introductory package for a new set of content, but that content will not be new again, so you will not need the package again. This is a good use case for delete.

There are two places you can unpublish/delete a package:

  • From the SVOD/AuthVOD Plans section check the package(s) you wish to unpublish/delete then click the appropriate button.
    unpublish delete
  • If you are editing the package, from the Package tab you can both unpublish and delete. Use the Status to unpublish or the Delete button to delete.
    unpublish delete when editing

Active Subscriptions info in Beacon Studio

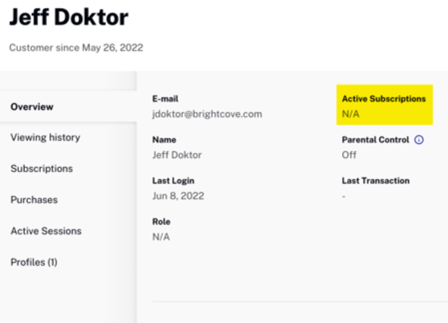
Note that in the Registered Users module in Beacon Studio when an AuthVOD package is implemented it is not directly shown. The Active Subscriptions information is reported as N/A. Here is an example:

N/A for AuthVOD